The task
Every term I set one of my classes a task of creating a eBook project in one of their subjects in line with the class curriculum and presenting the project as an online eBook using PowerPoint. This is because I want all of them to have practice in creating eBooks because eBooks are a great way to present online information. eBooks can be viewed online via a link. They can also be displayed on blogs either by embedding the PowerPoint or by creating a link to it. Here are the steps for this project.
Step 1: Choose your topic
You could create a project on any topic you like. In my case I chose a Grade 7 life skills curriculum project the students had to research and write a summary of one of the following diseases: which they would then present to the rest of the class full stop The diseases are: tuberculosis, pneumonia, malaria, measles, Hepatitis B, Influenza, Yellow Fever, Diphtheria, Small Pox or Black Death. I usually try to get two students working on one topic so that they can get together for brainstorms and planning but still come up with their own individual project.
Step 2: Create the content for the eBook
Give the students a rubric to guide them. This could include the type of pages/slides that they should use in their projects. In our case the pages/slides were as follows
1. Title page
2. Table of contents
3. Definition of the word disease.
4. A general overview of the disease they have chosen
5. The incidence of the disease, including a map
6. Causes of the disease
7. Signs and symptoms of the disease
8. Diagnosis
9. Treatment options
10. Strategies for living with the disease
11. Prevention of the disease
12. Additional interesting information
13. Bibliography
In each section the students need to find information, videos and images that are free to use; and create links to articles to back up their findings. They could collect the information via Microsoft Word before selecting from it for their final PowerPoint eBook. Here is the link to the rubric
http://bit.ly/2OLBUGE
Step 3: Create a PowerPoint template for the contents
We used PowerPoint for several reasons.
You can add video and sound to the final product via Office Mix.
You can embed the Power`poiYou can save the final product as a PDF.nt in a blog or website.
It is easy to manipulate images within the PowerPoint, and overlay images and text.
Each slide can also contain a section or page of information in the final eBook to add to the book feel of the final presentation.
The slides can be linked together for ease of use.
This is how you create the template:
Open PowerPoint and choose your layout. Decide how you would like the eBook to look.
Go to the Design Menu, Click on ‘Slide Size’ on the right and make your choices. We selected the portrait slide orientation and changed the slide size to Custom 7.5 X 10 inch (my computer works in inches!). This part is optional to the size you would like to choose.\
Point and choose your layout. Decide how you would like the eBook to look. We wanted the project to look like an eBook.
Here is a link to a presentation showing how to set
Step 4: Add the cover image
In this section we learn about Creative Commons images and Public Domain images versus ‘any’ images. The best way to add an image is to save it on your computer and then use the snipping tool to get the portrait orientation. Insert the cover image by clicking on the ‘Picture’ option in the ‘Insert’ menu, and select the cover image where you saved it on your computer.
The learners then overlay the cover image with their names and the title of the e-book. This feature is one of the plus points for using PowerPoint for making eBooks.
Here is an example of a cover page:
Step 5: Insert page numbers (slide numbers)
Start the numbering system now. Go to
Insert/Slide numbers and make your choices as shown below. Select
Slide number, Footer, Don’t show on the slide and
Apply to All
Step 6: Create a Table of Contents page
This allows the reader to go anywhere in the presentation. Once you have created all your slides you will link each heading in the Table of Contents to a slide heading.
Step 7: Create the eBook
The learners use the content they have recorded in Microsoft Word to create the content for their PowerPoint. They ensure that the font and font sizes are uniform throughout the eBook.
Step 8: Insert your bibliography as you go along
I like the learners to draw a line at the bottom of each slide so that they can put links to the pages where they found their information even though the information has been synthesised into their own words. They also create the Bibliography for the last slide with the relevant links.
We didn’t learn a particular format for citing a bibliography in this project – that will come later. I simply asked them to give an explanation and a link. In the next project we will write the Bibliography in the format below as found in A Sample Elementary Bibliography Style Sheet found at
http://bit.ly/2gOJxPe
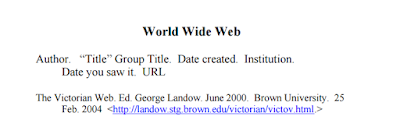
This is how we did the Bibliography for this project. It appeared on the last slide.
Step 9: Link the slides to the Table of Contents
Once your e-book has been written link your slides to the Table of Contents. The way to do this is:
a) Highlight the line of text in the Table of Contents you want to hyperlink
b) Go to Insert/Hyperlink
c) Select ‘Place in this document’
d) Chose the slide heading from the selection that appears
e) Click on OK
You’ll notice that all the hyperlinked lines of the eBook are now automatically underlined showing that they are active.


